
How to Customize Blogger's Lightbox - Selamat datang di situs media global terbaru Xivanki, Pada halaman ini kami menyajikan informasi tentang How to Customize Blogger's Lightbox !! Semoga tulisan dengan kategori
Blog Design !! ini bermanfaat bagi anda. Silahkan sebarluaskan postingan How to Customize Blogger's Lightbox ini ke social media anda, Semoga rezeki berlimpah ikut dimudahkan Allah bagi anda, Lebih jelas infonya lansung dibawah -->
For those of you who have chosen to use the Blogger's Lightbox View for displaying pictures when clicking on them, you have the option to change its style in a whole different way. You will be able to change the black color of the screen, the border or shadow of the images and the color of the thumbnails background. We can customize the Blogger Lightbox entirely on our taste.

Take a look at the screenshots below:
Before:

After:

After adding our CSS code, the entire look of the modal window will be changed: the background color, the bar showing the thumbnails, the border of images, the text within it, transparency and the close button.

All we have to do is to overwrite the default styles and change them with ours.
How to Change the Blogger's Lightbox Background and Style
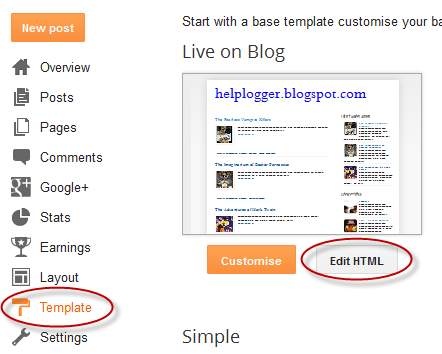
Step 1. Go to Template, click on the Edit HTML button (also click on the Proceed button if needed)
Step 2. Click anywhere inside the code area and search using CTRL + F the following tag:
</head>Step 3. Just above the </head> tag, add the following code:
<style>
/* Background Color */
.CSS_LIGHTBOX_BG_MASK {
background-color: #ffffff !important;
background-image: url(image-url-address) !important;
opacity: 0.8 !important;
filter: alpha(opacity=90) !important;
}
/* Images Border */
.CSS_LIGHTBOX_SCALED_IMAGE_IMG {
outline: 0px solid #fff !important;
-webkit-border-radius: 10px;
-moz-border-radius: 10px;
border-radius: 10px;
-webkit-box-shadow: 0px 0px 5px #000000;
-moz-box-shadow: 0px 0px 5px #000000;
box-shadow: 0px 0px 5px #000000;
}
/* Close Button */
.CSS_LIGHTBOX_BTN_CLOSE {
background: url(image-url) no-repeat !important;
width: 24px !important;
height: 24px !important;
}
/* Thumbnails Bar Color */
.CSS_LIGHTBOX_FILMSTRIP {
background-color: #eaeaea !important;
}
/* Text Color */
.CSS_LIGHTBOX_ATTRIBUTION_INFO, .CSS_LIGHTBOX_ATTRIBUTION_LINK {
color: #000 !important;
}
/* Index Info (number of images) */
.CSS_LIGHTBOX_INDEX_INFO {
color: #555555 !important;
}
</style>
Note:
- The text in green explains to which part the code belongs to and it doesn't need to be modified
For example, the portion below / * Background Color * / can change the background color or even the LightBox background color with an image - for this, change this line by replacing the red text with the url address of your image:
background-image: url(image-url) !important;- Below is the opacity: if you add a lower value ( 0.8 ) the background will become more transparent.
- To change the icon for the close button, you have to replace the text in red from /* Close Button */ with the URL of your image. (you can host image at tinypic or upload it into a blogger draft and then Copy the Link Location - read this tutorial for more info)
- To change the text color of images, replace the #555555 value from /* Index Info (number of images) */
- We can also change the look of the border around our pictures like we can make them more round, add a shadow, etc... but remember this is CSS3 and older versions of Internet Explorer will not show any changes.
Step 4. Click on Save Template and you're done!
Demikian info How to Customize Blogger's Lightbox, Semoga dengan adanya postingan ini, Anda sudah benar benar menemukan informasi yang memang sedang anda butuhkan saat ini. Bagikan informasi How to Customize Blogger's Lightbox ini untuk orang orang terdekat anda, Bagikan infonya melalui fasilitas layanan Share Facebook maupun Twitter yang tersedia di situs ini.